FireRabbit-Engine 实战 从零搭建个人博客(二)创建博客所需的表

Phinx

官方网站:Phinx - 官方文档

phinx 是一个数据库迁移插件,它可以帮你实现不使用 sql 文件来创建表。

框架还没集成数据库迁移系统,因此就需要自己手动安装了。

安装

执行命令:composer require robmorgan/phinx

初始化

第一次安装还需要进行初始化:vendor/bin/phinx init,不然 phinx 不知道你的数据库账号密码就无法连接了。

初始化完成后,在项目根目录会出现一个配置文件 phinx.php:

1
2
3
4
5
6
7
8
9
10
11
12
13
14
15
16
17
18
19
20
21
22
23
24
25
26
27
28
29
30
31
32
33
34
35
36
37
38
39
40
41
<?php

return
[
'paths' => [
'migrations' => '%%PHINX_CONFIG_DIR%%/db/migrations',
'seeds' => '%%PHINX_CONFIG_DIR%%/db/seeds'
],
'environments' => [
'default_migration_table' => 'phinxlog',
'default_environment' => 'development',
'production' => [
'adapter' => 'mysql',
'host' => 'localhost',
'name' => 'production_db',
'user' => 'root',
'pass' => '',
'port' => '3306',
'charset' => 'utf8',
],
'development' => [
'adapter' => 'mysql',
'host' => 'localhost',
'name' => 'development_db',
'user' => 'root',
'pass' => '',
'port' => '3306',
'charset' => 'utf8',
],
'testing' => [
'adapter' => 'mysql',
'host' => 'localhost',
'name' => 'testing_db',
'user' => 'root',
'pass' => '',
'port' => '3306',
'charset' => 'utf8',
]
],
'version_order' => 'creation'
];

默认是 development 环境,在这里修改自己的数据库配置。

虽然 phinx 是数据库迁移,但它本身创建不了数据库,需要手动创建。

修改完成后,再创建一个名词叫做 blog 的数据库即可。

迁移目录

根据配置文件最上方的目录:

1
2
3
4
'paths' => [
'migrations' => '%%PHINX_CONFIG_DIR%%/db/migrations',
'seeds' => '%%PHINX_CONFIG_DIR%%/db/seeds'
],

创建对应的文件夹。

创建表迁移

命令:vendor/bin/phinx create xxxx

xxx 是表名,使用大驼峰方式。

执行迁移

命令:vendor/bin/phinx migrate

项目所需表

博客项目需要的表及对应的字段,表名默认为复数形式(即加一个 s)。

所有的表都有一个自增主键。

用户表:users

  • name:昵称
  • email:注册邮箱
  • password:密码,采用明文方式存储(本项目只是测试而已~~~好孩子不要学)
  • created:注册时间

执行命令:vendor/bin/phinx create User

在迁移目录 migrations 即可看到迁移文件,修改迁移文件内容:

1
2
3
4
5
6
7
8
9
10
11
12
13
14
15
16
17
18
19
20
21
22
23
24
25
26
27
28
29
<?php
declare(strict_types=1);

use Phinx\Migration\AbstractMigration;

final class User extends AbstractMigration
{
/**
* Change Method.
*
* Write your reversible migrations using this method.
*
* More information on writing migrations is available here:
* https://book.cakephp.org/phinx/0/en/migrations.html#the-change-method
*
* Remember to call "create()" or "update()" and NOT "save()" when working
* with the Table class.
*/
public function change(): void
{
$table = $this->table('users', ['signed' => false]);
$table->addColumn('name', 'string', ['limit' => 16])
->addColumn('email', 'string', ['limit' => 64])
->addColumn('password', 'string', ['limit' => 64])
->addColumn('created', 'timestamp', ['default' => 'CURRENT_TIMESTAMP'])
->addIndex(['email', 'password'])
->create();
}
}

邮箱和密码设置为关联索引,这样用户在登录的时候可以直接从索引返回查询结果,查询速度非常快。

created 是时间戳,直接使用当前时间作为值。

文章表:articles

  • user_id:作者 ID
  • title:标题
  • classify:分类
  • cover:封面图
  • view_count:浏览次数
  • created:发布日期

执行命令:vendor/bin/phinx create ArticleContent

1
2
3
4
5
6
7
8
9
10
11
12
13
14
15
16
17
18
19
20
21
22
23
24
25
26
27
28
29
30
31
<?php
declare(strict_types=1);

use Phinx\Migration\AbstractMigration;

final class Article extends AbstractMigration
{
/**
* Change Method.
*
* Write your reversible migrations using this method.
*
* More information on writing migrations is available here:
* https://book.cakephp.org/phinx/0/en/migrations.html#the-change-method
*
* Remember to call "create()" or "update()" and NOT "save()" when working
* with the Table class.
*/
public function change(): void
{
$table = $this->table('articles', ['signed' => false]);
$table->addColumn('title', 'string', ['limit' => 32])
->addColumn('classify', 'string', ['limit' => 32])
->addColumn('cover', 'string', ['limit' => 255])
->addColumn('user_id', 'integer', ['signed' => false])
->addColumn('view_count', 'integer', ['signed' => false])
->addColumn('created', 'timestamp', ['default' => 'CURRENT_TIMESTAMP'])
->addIndex(['user_id'])
->create();
}
}

文章内容表:article_contents

  • article_id:文章 ID
  • content:内容

执行命令:vendor/bin/phinx create ArticleContent

1
2
3
4
5
6
7
8
9
10
11
12
13
14
15
16
17
18
19
20
21
22
23
24
25
26
27
<?php
declare(strict_types=1);

use Phinx\Migration\AbstractMigration;

final class ArticleContent extends AbstractMigration
{
/**
* Change Method.
*
* Write your reversible migrations using this method.
*
* More information on writing migrations is available here:
* https://book.cakephp.org/phinx/0/en/migrations.html#the-change-method
*
* Remember to call "create()" or "update()" and NOT "save()" when working
* with the Table class.
*/
public function change(): void
{
$table = $this->table('article_contents', ['signed' => false]);
$table->addColumn('article_id', 'integer', ['signed' => false])
->addColumn('content', 'text')
->addIndex(['article_id'])
->create();
}
}

email_codes:邮件验证码

  • email:邮箱
  • code:验证码
  • created:创建日期

执行命令:vendor/bin/phinx create EmailCode

1
2
3
4
5
6
7
8
9
10
11
12
13
14
15
16
17
18
19
20
21
22
23
24
25
26
27
28
<?php
declare(strict_types=1);

use Phinx\Migration\AbstractMigration;

final class EmailCode extends AbstractMigration
{
/**
* Change Method.
*
* Write your reversible migrations using this method.
*
* More information on writing migrations is available here:
* https://book.cakephp.org/phinx/0/en/migrations.html#the-change-method
*
* Remember to call "create()" or "update()" and NOT "save()" when working
* with the Table class.
*/
public function change(): void
{
$table = $this->table('email_codes', ['signed' => false]);
$table->addColumn('email', 'string', ['limit' => 64])
->addColumn('code', 'string', ['limit' => 8])
->addColumn('created', 'timestamp', ['default' => 'CURRENT_TIMESTAMP'])
->addIndex(['email'])
->create();
}
}

生成表

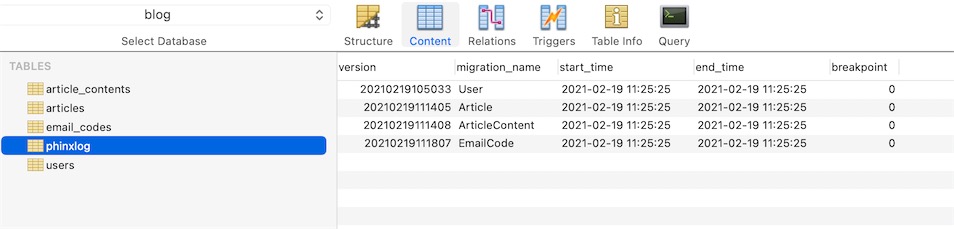
执行命令:vendor/bin/phinx migrate

然后打开数据库,可以看到:

QQ20210219-193050.jpg

生成了这些表之后,就可以直接用框架集成的 ORM 调用了。

Model

ORM 默认使用的表名即复数形式,也可以指定一个表名,只需要修改 $table 变量即可。

创建一个用来保存模型文件的目录 app/Http/Model。

User

1
2
3
4
5
6
7
8
9
10
11
12
13
14
15
16
17
18
19
<?php
/**
* Created by PhpStorm
* Author:FireRabbit
* Date:2021/2/19
* Time:14:00
**/


namespace App\Http\Model;


use Illuminate\Database\Eloquent\Model;

class User extends Model
{
protected $guarded = [];
public $timestamps = false;
}

Article

1
2
3
4
5
6
7
8
9
10
11
12
13
14
15
16
17
18
19
20
21
22
23
24
<?php
/**
* Created by PhpStorm
* Author:FireRabbit
* Date:2021/2/19
* Time:19:43
**/


namespace App\Http\Model;


use Illuminate\Database\Eloquent\Model;

class Article extends Model
{
protected $guarded = [];
public $timestamps = false;

public function content()
{
return $this->hasOne(ArticleContent::class)->withDefault();
}
}

ArticleContent

1
2
3
4
5
6
7
8
9
10
11
12
13
14
15
16
17
18
19
<?php
/**
* Created by PhpStorm
* Author:FireRabbit
* Date:2021/2/19
* Time:19:43
**/


namespace App\Http\Model;


use Illuminate\Database\Eloquent\Model;

class ArticleContent extends Model
{
protected $guarded = [];
public $timestamps = false;
}

EmailCode

1
2
3
4
5
6
7
8
9
10
11
12
13
14
15
16
17
18
19
<?php
/**
* Created by PhpStorm
* Author:FireRabbit
* Date:2021/2/19
* Time:19:44
**/


namespace App\Http\Model;


use Illuminate\Database\Eloquent\Model;

class EmailCode extends Model
{
protected $guarded = [];
public $timestamps = false;
}

结束语

现在数据库和模型已经设定好了,接下来就可以直接开始业务处理了!

文章作者: 火烧兔子
文章链接: http://huotuyouxi.com/2021/02/19/firerabbit-engin-2/
版权声明: 本博客所有文章除特别声明外,均采用 CC BY-NC-SA 4.0 许可协议。转载请注明来自 火兔游戏工作室